Friday, 27 March 2015

My Complete Foundation Collection | Makeup Showdown


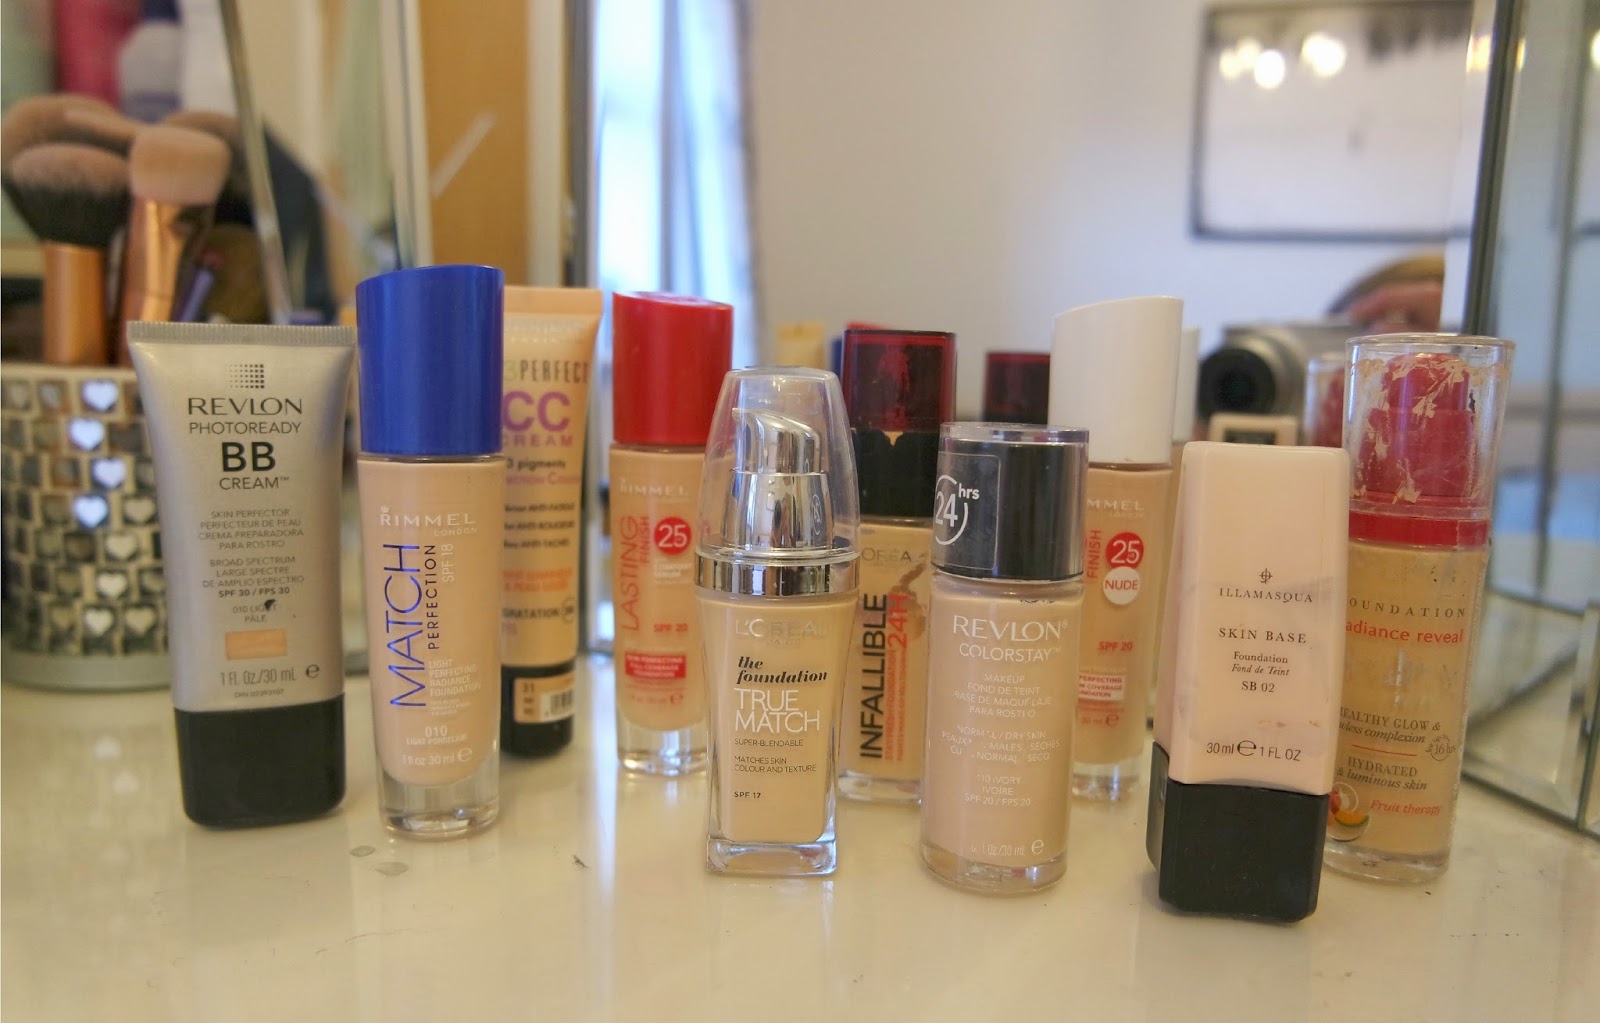
You know you have too many foundations when trying to take a photo of them all is like arranging a class photograph. "Come then everyone, tall ones at the back, little guys at the front - you too Revlon Colour Stay, we don't have all day!" With ten foundations to compare, I'm not even going to attempt to go into great detail on each one. Instead, I've got another Makeup Showdown for you where I’ve divided the judging process into “need to know categories” with an overall rating out of ten. Please note however, that my skin type is extremely dry, and I suffer from redness, large pores and a few fine lines (sad face) so the overall rating is based on how effective each foundation is on me, and what I look for in a base.

Bourjois CC Cream
Coverage: Light, but better than you expect!
Finish: Matte-ish Satin
Lasting power: A full day out in the sunshine, it'll fade only slightly
Final Thoughts: For such a runny, barely there formula, this covers and lasts brilliantly. In the summer it's light enough to work on my very pale skin, and is by far the best CC/BB/tinted moisturiser product I've come across.
Overall Rating: 10/10

Rimmel Lasting Finish Nude
Coverage: Medium
Finish: Matte/Satin
Lasting power: Easily enough to get you through work and after work drinks
Final Thoughts: Definitely a fab foundation, it ticks every box and I wear it a lot but it's slightly behind Rimmel Match Perfection, which is just that bit better on dry skin.
Overall Rating: 8.5/10

Illamasqua Skin Base
Coverage: Very Full
Finish: Very Matte
Lasting power: Ages (probably)
Final Thoughts: No matter what I do, I cannot get this foundation to look passable. Some people love it but I find I look like a cake-face clown in a mask of heavy makeup and I've worn it out in public maybe twice? Thorough disappointment as it's the most expensive I currently own!
Overall Rating: 2/10

Revlon ColourStay
Coverage: Very Full
Finish: Very Matte
Lasting power: Good, but it does begin to settle
Final Thoughts: These days I find ColourStay to settle in my smile lines and around my nose after four/five hours, no matter how I apply it. It can also look cakey and heavy on the skin sometimes but is a holy grail for a lot of oily skinned girls - I loved this in my oily teenage years!
Overall Rating: 6/10

Rimmel Match Perfection
Coverage: Lightish Medium
Finish: Fresh, Dewy
Lasting power: It'll do you proud for a full working day
Final Thoughts: For once, dewy does not mean greasy! I love this guy mostly for the finish and blendibility. Perfect for dry skin and bad skin days as it glides over imperfections and texture and doesn't highlight them.
Overall Rating: 10/10

L'Oreal Infallible
Coverage: High Medium - Full
Finish: Fresh Satin/Matte
Lasting power: Till the cows come home
Final Thoughts: This would be another 10 pointer, and probably my favourite if it wasn't for the fact that regular use breaks me out. On special occasions though I wouldn't wear anything else.
Overall Rating: 9/10
Revlon Photo Ready BB Cream
Coverage: Very Light
Finish: Dewy/Shiny
Lasting power: An hour or two before greasiness kicks in
Final Thoughts: Another disappointment. This guy oxidises as the day goes on and looks greasy after a short amount of time. It also just doesn't seem to sink into the skin and transfers a fair bit.
Overall Rating: 3/10

L'Oreal True Match
Coverage: High Medium
Finish: Fresh Satin
Lasting power: Enough to last you a serious Saturday shopping spree
Final Thoughts: I can see that this guy would be a great contender, but it loses serious points for colour! It's called "True Match" yet doesn't have a shade light enough for me, and the closest one oxidises to the point where I can no longer 'get away with it' after around four hours.
Overall Rating: 5/10

Rimmel Lasting Finish
Coverage: High Medium - Full
Finish: Matte/Satin
Lasting power: Through the party, the after party and the walk of shame
Final Thoughts: It's good, but I just don't reach for this one often because I rarely need the coverage and if I do, L'Oreal Infallible looks better and lasts just as long. But hey, at least Rimmel doesn't break me out.
Overall Rating: 7/10

Bourjois Healthy Mix
Coverage: Lightish Medium
Finish: Dewy
Lasting power: Will get you through a school day
Final Thoughts: A real teenage cult classic, this foundation performs well on younger skin as it's not too heavy but gives good coverage, lasts around six hours and blends well.
Overall Rating: 8/10


Let me know if there's any foundations missing that you think I should try. I still don't feel like I've found that Holy Grail base yet so I'd love to hear your suggestions!


SHARE:

Wednesday, 25 March 2015

Blonde Eyebrow Routine &Threading Experience

WARNING: Unedited, painfully close close-ups of my face will be shown in this post. If you are sensitive to skin redness, fine lines and giant pores, look away now... Just being real here, people.


Disturbing isn't it? These photos show first hand, the struggle that us fair skinned, blonde haired girls must go through every day in the battle against our own eyebrows. Sparse, shapeless and ginger toned, my eyebrows have always been a major hassle to deal with as they refused to cooperate with me. (Why can't you just be thick, dark and nicely arched, is that too much to ask for?) In fact, that's a lie, because until the age of about seventeen, I was totally unaware of the awesome power eyebrows have to completely frame and define your face. I wish I'd known sooner what a life changing event getting them threaded and tinted would be, so I could have avoided looking like essentially an egg with a smiley face drawn on it throughout high school. Ahhh, good times...
So, let's take a look at what I'm naturally working with, sort of.

The skin is shiny because it's covered in Vaseline!
I say sort of because above is a photo of my eyebrows after they've been shaped through a technique called threading. Threading is and Indian method of hair removal, where a cotton or polyester thread is twisted and rolled over areas of hair, removing them from the root in straight lines. Very similar to tweezing, but it removes many hairs at once, and the thread is used to create sharp, defined lines - perfect for brows. Most people think threading is better than waxing as it doesn't rip or burn the skin and, supposedly, doesn't hurt as much. You must go to a professional to get your brows threaded or waxed, 'cos believe me girls, eyebrows aren't something you want to take a chance with. We don't want to end up with a wonky nineties pencil thin brow, now do we? I go to a lovely lady called Sheri, and frankly, I wouldn't let anyone else touch my brows because she works complete miracles. All of Sheri's info will be listed below if you're in need of a great Beautician.
To begin with, Sheri finds (or creates) an arch in my brows, which are naturally very straight, and then twists the thread using her fingers and teeth (it's pretty awesome to watch actually) to remove any hair outside of the shape she wants them to be. Does it hurt? Only a tiny bit, every time I go it gets less and less painful, and no, I'm not just saying that! Truth be told, I hardly feel it anymore and a good brow consultant will tell you to gently stretch the skin above the brow and place your other hand over your eye, which will reduce the pain. It's all over in less than 60 seconds anyway!


Next, Sheri then covers the skin around the brows in Vasaline, to stop the dye from bleeding outwards and tinting my entire forehead, and applies the brow tint in what first looks like a terrifyingly dark shade... The first time I ever had this applied, I took one look at my dye-covered sharpie brows and thought "Oh God, what have you done?" and then in typical British fashion continued to smile politely and pretend it was fine. You can imagine my relief when my brows ended up looking like this:


After two or three minutes, Sheri removes the dye and my otherwise non-existent brows are left looking like they've been filled in already. The picture above is now what my natural, unedited, brows look like without any makeup. Of course, I can apply brow pencil, powder or gel over the top and strengthen them even further if I wanted to, which becomes much easier now a perfect shape has been mapped out for me. For this I use the Soap & Glory Archery Pencil, an incredible dupe for the Anastasia Brow Wiz. Or, I can leave them as they are and have naturally soft but defined brows, that give my face structure on lazy days. The hairs are now much darker than before, and the dye has even picked up all the little fussy blonde fluff to make them appear thicker. Another great thing about getting your brows tinted, is that the dye leaves a slight tint on the skin underneath the brow, helping them to appear fuller, sharper and elongated.

So if you're scared of threading or dying your brows - don't be! It makes all the difference, especially for us fair girls, and halves the amount of time I spend on my brows in the morning. But like I said earlier, before you take the plunge, seek out a professional! Don't let your inner Cara Delevinge turn into Oscar the Grouch... Ask a friend with great brows where they get theirs done and don't go for a "home tint kit" unless you're confident you know what you're doing.
Leave your favourite brow products in the comment section below for me to read too - I'm always on the look out for brow enhancing products!


Sheri's Details

If you're in the Ipswich area and on the look out for a great Beautician, then check out the lovely Sheri's Facebook Page here and follow her on Twitter. Sheri has done my brows amazingly for years, and is also qualified in massage, waxing, nail art and other beauty treatments.


SHARE:

Monday, 23 March 2015

Collection Eyes Uncovered vs Urban Decay Naked 2 Basics


I'm sure you've all heard the hype surrounding the new Collection Eyes Uncovered pallets. They've been getting a lot of love online and respected bloggers such as Amelia Liana have even said that they rival Urban Decay shadows. Careful Miss Liana, those are some big claims...
Being a huge, huge fan of the Urban Decay Naked 2 Basics pallet, I couldn't resist getting my hands on a potential "dupe" to put to the test. Especially if said dupe is going to mean repurchasing at a fraction of the cost in future. Urban Decay Naked 2 Basics: £25. Collection Eyes Uncovered Pallets: £2.99 (usually £3.99). Seriously, it's a staggering difference.

(Urban Decay on top, Collection on the bottom.)
I own rather a lot of eye shadows, most in pallet form, so despite the pleasing price tag I did the sensible thing and only bought the one Collection pallet; "Nude" the one most comparable to my Urban Decay Basics. Most comparable indeed... The pallets are also available in Nude Grey (a little shimmery for me), and Nude Bronze (gorgeous looking).
With six strikingly similar shades, Collection honestly looked like it was going to knock Urban Decay out of the water (water? park?) when I compared them at home. Collection had definitely taken a more shimmery route, with only the darkest two shades being a satin finish, whereas Urban Decay chose to keep things all matte for both their Basics pallets.

(Collection shades from L-R: White Chocolate, Buttercream, Biscuit, Chocolate Milk, Brown Sugar, Espresso) 

(Urban Decay shades from L-R: Skimp, Stark, Frisk, Cover, Primal, Undone) 
When swatched on the skin and worn on the eyes, the differences in the pallets become much more apparent, and our Collection Eyes Uncovered shades warm up considerably. The shades Biscuit and Chocolate Milk look like they'd be better suited in the bronze pallet, but that might just be my fair skin talking. The first shade, White Chocolate, also turned out to be useless. Even swatched on my boyfriend's very olive forearm, I just couldn't get any colour to show up. Now, if I had a totally unusable/dud shade in a more expensive pallet, I might feel a little conned, but for £2.99 I'm really not bothered as the pallet had outdone my expectations already.  Buttercream and Brown Suagr ended up being my favourite, with the pinky champagne all over the lid and Brown Sugar the cool taupe to define the crease. I've smoked Espesso along the lash line a few times too and it really deepens the look.
So which one is better? Well, I must admit that I don't find the lasting power on the Collection Eyes Uncovered pallet matches up to Urban Decay. The two really shimmery shades, Buttercream and Biscuit fade in intensity throughout the day which is something I don't find with Urban Decay. The Collection Eyes Uncovered are also less pigmented, but not badly pigmented at all. Both pallets are smooth and buttery, making them super easy to blend. Both pallets have a great shade range, with colours that flatter and work well together. Both pallets have classy packaging and are small and convenient to travel with. But only one pallet has the gloriously affordable price tag, and therefore I've got to say overall... Collection wins!

Whilst I still reach for my Urban Decay Basics 2 pallet more often, that's only because I have both pallets available to me. If you don't, then Collection is hands down the one I recommend you pick up. It'll cost a fraction of the price, create incredibly similar eye looks, and did I mention, cost a fraction of the price? If you end up reaching for the Collection Eyes Uncovered Pallet every day for six months, then maybe you should think about sticking a longer lasting Urban Decay version on your Christmas list, but don't rush to spend a large chunk of money on something you can easily dupe. Especially when many makeup junkie's will be pleased they only spent a measly £2.99 when, in a few weeks time, they're completely obsessed with a brand new pallet anyway...
SHARE:
© Uptown Peach | All rights reserved.
Blogger Template Created by pipdig